Copyright © 2008 Grigor Iliev <grigor@grigoriliev.com>
This document is released under the terms of the GNU Free Documentation License.
Updated: Tue, 26 August 2008
Table of Contents
Table of Contents
JSampler is an opensource, platform-independent, GUI front-end for LinuxSampler, written entirely in Java. The main goal of the JSampler's design is to be extensible and more flexible regarding the integration of different GUI implementations. JSampler consists of two parts:
JSampler core - handles the LSCP command processing and event notifications, sent by LinuxSampler, and provides convenient data models and controllers to be used instead. The core also provides the necessary interfaces that should be implemented by all JSamler views.
JSampler view - an extension to the JSampler core, which provides the user interface part of JSampler.
The main reason for that is the TCP/IP based communication between the LinuxSampler and its front-ends, enabling the sampler to be controlled from another computer or device, which may have different display requirements and limitations.
A JSampler distribution consist of the JSampler core and at least one view, providing the GUI implementation. Each distribution has its own name, which is based on the integrated view extension. Currently, there are two distributions:
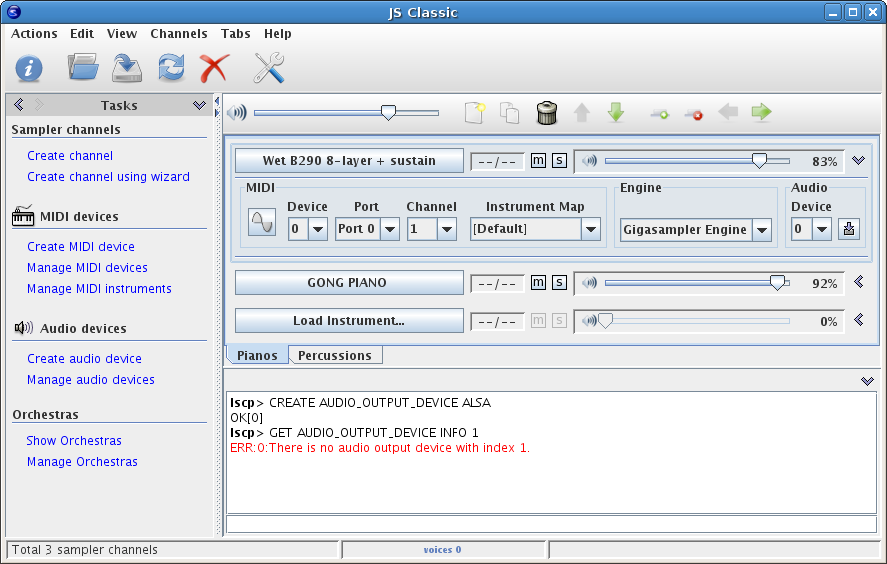
JS Classic - A distribution with a standard GUI, capable of controlling all features available in LinuxSampler at the time of this writing. JS Classic also provides some additional features to facilitate the every day work with the sampler and to automate the most frequently used configurations.
Fantasia - A distribution with a modern skin based view (initial graphic design by Olivier Boyer).
JS Classic with left pane, LS console, statusbar and toolbars
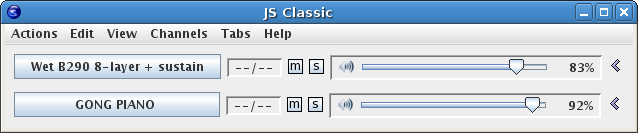
JS Classic without left pane, LS console, statusbar and toolbars
Fantasia
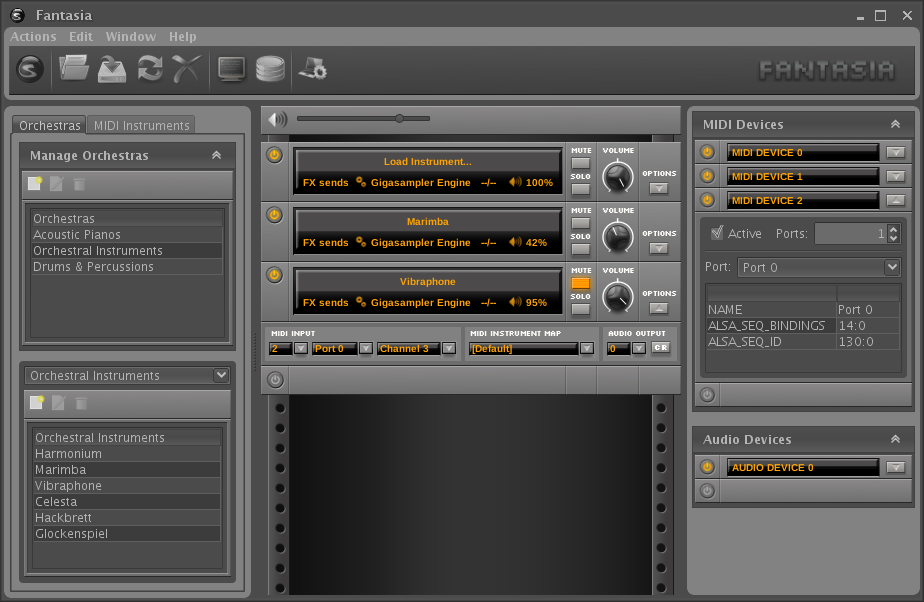
Table of Contents
Currently, there are two distributions available for download - JS Classic and Fantasia.
The source code is available in the JSampler package, which also contains this manual and startup scripts that can be used to run a particular JSampler distribution.
The latest source code can be obtained from Subversion with the following command:
svn co https://svn.linuxsampler.org/svn/jsampler/trunk jsampler
To run JSampler you need Java Runtime Environment (JRE) version 6 or higher. The latest version can be downloaded from here.
To build JSampler distribution from source you need JDK version 6.0 or higher and the Ant tool.
Let's assume that you want to run from the command line
JS_Classic-0.8a.jar, which is located in
/home/me/soft directory. First you should check whether the
java command is in your path and the version requirements
are met. This can be done by issuing the following command:
java -version
If the version is 1.6.0 or higher you can run JS Classic by issuing the following command:
java -jar /home/me/soft/JS_Classic-0.8a.jar
Otherwise, if the shell response is something like
bash: java: command not found
or the version requirements are not met, make sure that you have installed JRE (or JDK) with the proper version and find its location:
updatedb
locate bin/java
The shell should return something like:
/opt/jdk1.6.0/bin/java
/opt/jdk1.6.0/bin/javac
/opt/jdk1.6.0/bin/javadoc
/opt/jdk1.6.0/bin/javah
/opt/jdk1.6.0/bin/javap
/opt/jdk1.6.0/jre/bin/java
/usr/bin/java
Now, we know that we have a JDK with a proper version installed
and its location is /opt/jdk1.6.0. In that case, to run JS
Classic issue the following command:
/opt/jdk1.6.0/bin/java -jar /home/me/soft/JS_Classic-0.8a.jar
Note
On some systems double clicking on the jar file will be enough.
There are scripts In the scripts directory of the
JSampler
package that, with a little adjustments (if needed), can be used
to run a JSampler distribution. Copy them to a desired location and edit
with your preferred editor.
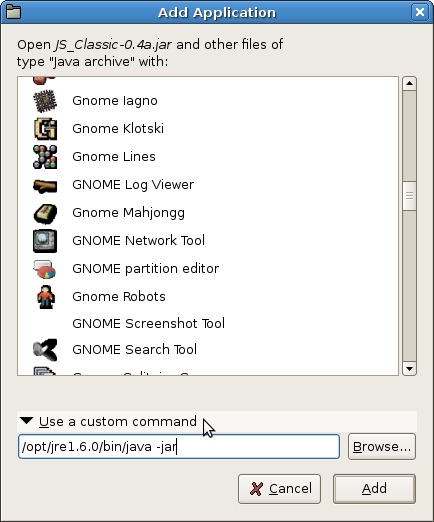
This configuration is optional, but necessary if you want to run jar files by (double) clicking on them. In Gnome, by default jar files are opened with the Archive Manager. To change that, run a file browser, right click on an arbitrary jar file and choose , than go to the Open With tab and click the button.
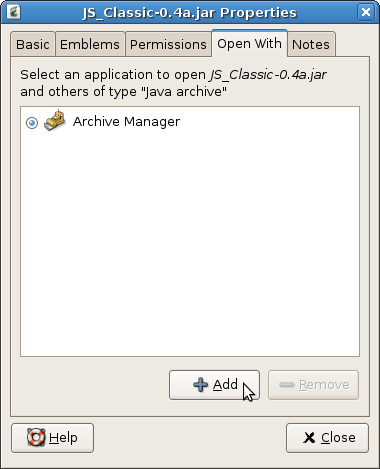
In the Add Application dialog click onto
Use a custom command label and a text field will
appear below. If the location of your JRE is /opt/jre1.6.0,
then enter the following command in the text box:
/opt/jre1.6.0/bin/java -jar
And then click the button.
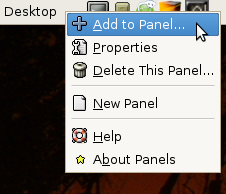
To add an application launcher to a Gnome panel, right click on the panel and choose .
Then select Custom Application Launcher and click the button. In the Command field, of the Create Launcher dialog, fill in the exact command that you use to run the JSampler. For more information on how to run a JSampler distribution from the command line click here.
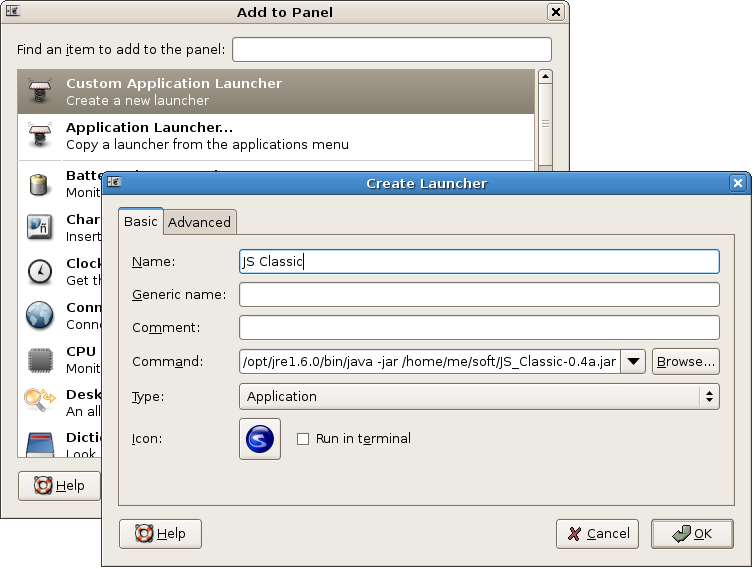
Table of Contents
If you want to build a JSampler distribution from source, first make sure that all requirements are met.
When building from Subversion, there are some additional steps that
should be done. JSampler uses two additional libraries, that should be
downloaded and placed in the lib/required directory:
Download these libraries, create a
lib/required directory in the JSampler root and copy the
jlscp.jar and juife.jar files in that
directory:
cd /home/me/soft
wget -c http://downloads.sourceforge.net/jlscp/jlscp-0.7a.tar.bz2
tar -xjf jlscp-0.7a.tar.bz2
wget -c http://downloads.sourceforge.net/juife/juife-0.4a.tar.bz2
tar -xjf juife-0.4a.tar.bz2
svn co https://svn.linuxsampler.org/svn/jsampler/trunk jsampler
cd jsampler
mkdirhier lib/required
cp ../jlscp-0.5a/lib/jlscp.jar lib/required/jlscp.jar
cp ../juife-0.4a/lib/juife.jar lib/required/juife.jar
Tip
In most cases it is sufficient just to copy the lib directory from the last release, but first check if there are some significant recent changes to those libraries.
Then follow the steps in the next section.
To build a JSampler distribution, first set the
JAVA_HOME environment variable to point to your JDK
directory. If the JDK is installed in /opt/jdk1.6.0 directory, this can
be done by issuing the following command:
export JAVA_HOME=/opt/jdk1.6.0
Windows users should do something like:
set JAVA_HOME=c:\jdk1.6.0
Go to the JSampler root directory and issue the following command:
ant [target]
Where target can be one of the following:
build-jsclassic - Builds a JS Classic distribution.
clean-jsclassic - Removes the JS Classic distribution.
build-fantasia - Builds a Fantasia distribution.
clean-fantasia - Removes the Fantasia distribution.
build-coredoc - Generates the API documentation for the JSampler core.
clean-coredoc - Removes the API documentation for the JSampler core.
So, if you want to build a JS Classic distribution, just issue the following command:
ant build-jsclassic
Then copy the jar file from the dist directory to the
desired location.
Table of Contents
Orchestras feature is like bookmarks/favorites for instruments. Instead of having a thousands of unsorted instruments you can categorize your most used instruments for quick access by adding them to orchestras. You can create an arbitrary number of orchestras and in any orchestra you can add an arbitrary number of instruments.
Note
Orchestras are not handled by the back-end (LinuxSampler) and
does not depend on the Instruments Database. The
orchestras are handled by JSampler and are stored on the local machine
in <jsampler-home>/orchestras.xml. To port the
orchestras to another machine just copy that file.
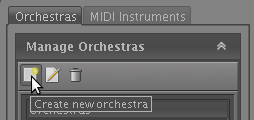
Manage Orchestras tool buttons:
 Create new
orchestra
Create new
orchestra
 Edit
selected orchestra
Edit
selected orchestra
 Remove
selected orchestra
Remove
selected orchestra
To create a new orchestra, click on the Orchestras tab then click the button in the Manage Orchestras tool:
Then choose orchestra name and description and click button.
To remove an orchestra, select the orchestra and click the button. To edit an orchestra, select the orchestra and click the button, or just double-click the orchestra to edit.
Tip
To change the position of an orchestra in the orchestra list, select the orchestra and use Alt+Up Arrow and Alt+Down Arrow to move the selected orchestra up/down. You can also use Alt+Shift+Up Arow to move the selected orchestra on top and Alt+Shift+Down Arrow to move the selected orchestra to bottom.
Managing Instruments tool buttons:
Add new
instrument
Edit
selected instrument
Remove
selected instrument
To add a new instrument to orchestra, first select the desired orchestra from the combobox then click the Add new instrument button:

Tip
The easiest way to add an instrument to orchestra is to right-click an instrument in the Instruments Database, then select and choose the orchestra to which to add the selected instrument. Note that you can select and add more than one instrument to orchestra at once.
To remove an instrument, select the instrument and click the button. To edit an instrument, select the instrument and click the button, or just double-click the instrument to edit.
Tip
To change the position of an instrument in the instrument list, select the instrument and use Alt+Up Arrow and Alt+Down Arrow to move the selected instrument up/down. You can also use Alt+Shift+Up Arow to move the selected instrument on top and Alt+Shift+Down Arrow to move the selected instrument to bottom.
To load an instrument from orchestra to a sampler channel, right-click on the instrument, select , then choose on which channel to load the selected instrument. You can also load an instrument from orchestra to a sampler channel using the instrument chooser of the sampler channel - click Select instrument from orchestra radio button, choose orchestra and isntrument from the comboboxes and click button
Table of Contents
The sole purpose of the MIDI instrument mapping is to provide a way to change the loaded instrument on a specific sampler channel through the MIDI keyboard by switching to different MIDI bank/program. To do that you need at least one MIDI instrument map with MIDI instruments mapped for the desired MIDI banks/programs and to assign that map to the sampler channels which instruments should be switched using MIDI bank/program changes.
Note that when stopping LinuxSampler all MIDI instrument mappings are gone forever, so it is crucial to export the MIDI instrument maps before quiting your session to be able to load them again next time you start LinuxSampler. This can be done by choosing //.
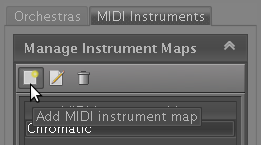
MIDI Instrument Maps tool buttons:
Add MIDI
instrument map
Edit
selected MIDI instrument map
Remove
selected MIDI instrument map
To create a new MIDI instrument map, click the MIDI Instruments tab in the Left-Side pane then click the button.
Then choose map name and click button.
To remove a map, select the map and click the button. To edit a map, select the map and click the button, or just double-click the map to edit.
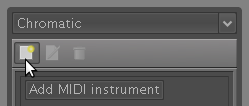
Managing MIDI Instruments tool buttons:
Add new
MIDI instrument
Edit
selected MIDI instrument
Remove
selected MIDI instrument or bank
To map a MIDI instrument, first select the desired MIDI instrument map from the combobox then click the Add new MIDI instrument button:
Tip
The easiest way to map a MIDI instrument is from the Instruments Database.
To remove a MIDI bank/instrument, select the MIDI bank/instrument and click the button. To edit a MIDI instrument, select the MIDI instrument and click the button, or just double-click the MIDI instrument to edit.
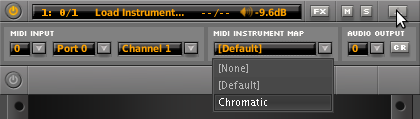
Table of Contents
The communication between LinuxSampler and its front-ends is TCP/IP based, which provides an option the sampler to be controlled from another computer or device, and while instrument loading is a regular task in the sampler, there should also be a convenient way to browse and load instruments (located on the sampler box) from a front-end launched on a remote host. This need is well covered by the Instruments Database. However, this is not the only purpose of the Instruments Database. It is a great tool that helps you to not get lost in your instrument collection, providing you a flexible way to create your own tree structure and to organize your instruments in more than one way, without moving or altering the instrument files located all over your hard drives. Another great feature is the search engine with enhanced search capabilities providing you fast and easy way of finding instruments by various criteria.
It is crucial to understand that, unlike Orchestras, the Instruments Database is handled by LinuxSampler, not by JSampler, and by default the database file is located in /var/lib/linuxsampler/instruments.db on the host where the back-end is started.
Note that you can have more than one instruments database and you can specify which one to be used on LinuxSampler startup. To create a new database file issue the following command:
linuxsampler --create-instruments-db my_instruments.db
which will create a new database file called my_instruments.db in the current directory.
To start LinuxSampler using the newly created instruments database use the --instruments-db-location option:
linuxsampler --instruments-db-location my_instruments.db
To backup the instruments database just copy the database file.
Choose / to bring up the Instruments Database window, or click the corresponding tool button. Initialy, the instruments database is empty, so you should manually create the desired directories and add instruments to them.
To create a new directory, select the directory, in which the new directory should be created and choose /, or right-click a blank area and choose .
To add instruments to specific instruments database directory, go to that directory and select / submenu, where you have two options - to scan a specific instrument file and add the instruments in that file to the instruments database or scan a file system directory for instrument files and add the instruments to the instruments database.
Basic commands:
Cut - /, or right-click on a selected file or directory and choose or Ctrl+X
Copy - /, or right-click on a selected file or directory and choose or Ctrl+C
Paste - /, or right-click a blank area and choose or Ctrl+V
Rename - /, or right-click on a selected file or directory and choose or press F2
Delete - /, or right-click on a selected file or directory and choose or press the Delete key from the keyboard
Tip
This commands also work on a multiple selection.
To load an instrument to a sampler channel from the Instruments Database, right-click on the instrument and choose , then choose the sampler channel where the instrument should be loaded to. Note that you need to have at least one sampler channel created, otherwise the submenu is disabled.
To add an instrument to MIDI instrument map from the Instruments Database, right-click on the instrument and choose , then choose the MIDI instrument map to which to add the selected instrument. Note that you need to have at least one MIDI instrument map, otherwise the submenu is disabled. For more info read MIDI Instruments.
Tip
To add more than one instrument from an instrument directory at a time, select the instruments and right-click on one of the selected instruments.
To add an instrument to orchestra from the Instruments Database, right-click on the instrument and choose , then choose the orchestra to which to add the selected instrument. Note that you need to have at least one orchestra, otherwise the submenu is disabled. For more info read Using Orchestras.
Tip
To add more than one instrument from an instrument directory at a time, select the instruments and right-click on one of the selected instruments.